
How to Patch a Small Hole in Drywall
A complete step-by-step homeowner's guide to repair wall holes up to 4 inches wide with professional-looking, seamless results.
Editorial Research Standard
Our conclusions are based on relevant manufacturer specifications, product documentation, warranties, and professional guidance. The evidence used varies by guide and is disclosed below.
Learn more in our Editorial Policy.
Accidents happen, but fixing a small drywall hole (from a doorknob strike or drywall anchor pullout) is a simple task that any homeowner can complete. This guide walks you through repairing holes up to 4 inches in diameter using a mesh patch kit, ensuring the repaired section blends seamlessly into the surrounding wall.
Note: This guide is formulated from manufacturer repair instructions and drywall contractor standards. Firsthand testing was not performed for this guide.
Project Specifications
- Difficulty Level: Easy (Beginner-friendly)
- Estimated Working Time: 30 minutes (spread across two sessions)
- Estimated Total Time: 2 to 4 hours (includes compound drying times)
- Approximate Material Cost: $15–$25 (assuming you already own basic tools)
Tools and Materials
Tools Required
- Putty knife (3-inch or 4-inch wide carbon steel)
- Utility knife
- Hand sander with 120-grit and 220-grit sandpaper
- Damp sponge
- Dust mask
Materials Required
- Self-adhesive mesh drywall patch (metal-reinforced, 4“x4” or 6“x6” depending on hole size)
- All-purpose joint compound (or lightweight spackle like DAP DryDex)
- Interior wall primer
- Matching interior wall paint
Safety Precautions
- Respiratory Protection: Drywall sanding creates ultra-fine silica and gypsum dust. Always wear a dust mask or respirator.
- Eye Protection: Wear safety glasses while sanding or cleaning drywall dust overhead.
- Wiring Hazard: Inspect the interior of the wall cavity with a flashlight before applying a patch to ensure no active electrical wiring or plumbing lines run directly behind the damage.
Preparation and Step-by-Step Instructions
Step 1: Clean the Damaged Area
Using a utility knife, trim away any loose paper flaps, crumbling gypsum dust, or raised paint edges surrounding the hole. The area must be flat and clean. Wipe the dust away using a slightly damp sponge and let it dry.
Step 2: Apply the Mesh Patch
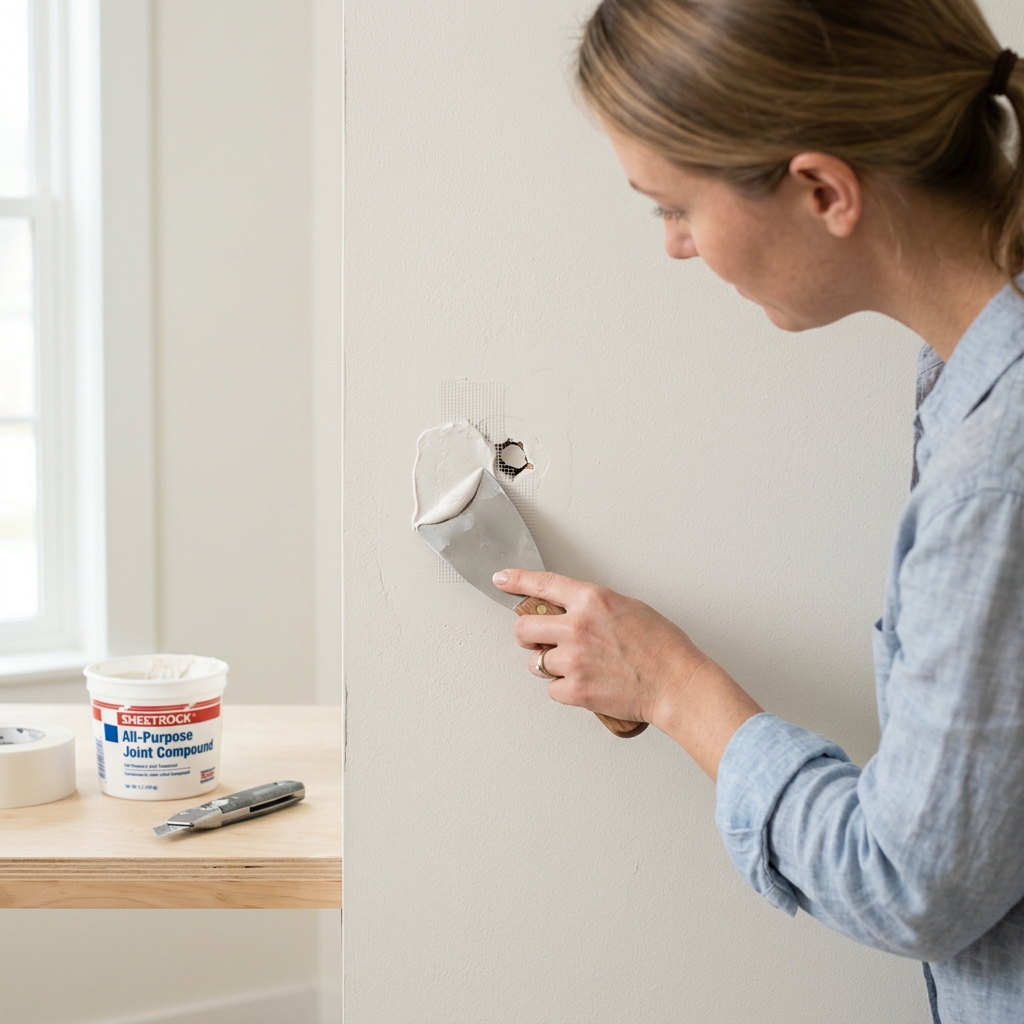
Peel the backing paper off the self-adhesive mesh patch. Place the metal-reinforced side center-aligned over the hole and press it firmly against the wall. Rub the mesh border to ensure good adhesion to the painted wall surface.
Step 3: Apply the First Coat of Joint Compound
Using your putty knife, scoop a golf-ball-sized amount of joint compound. Apply it over the mesh patch starting from the center of the hole and working outward.
- Tip: Hold the putty knife at a 45-degree angle. Feather the compound outward approximately 2 inches past the mesh border so the edge slopes down to the wall. Keep this layer thin—you should still be able to see the outline of the mesh patch texture underneath.
- Let it dry for 1 to 2 hours (or until spackle turns white if using color-change compound).
Step 4: Sand and Apply the Second Coat
Once dry, sand the first coat lightly with 120-grit sandpaper to remove high spots or ridges. Wipe away dust. Apply a second, wider coat of joint compound, extending the edges 3 to 4 inches past the first coat. Press the putty knife firmly at the outer perimeter to feather the edge down to zero. Let dry completely (typically 2 to 4 hours).
Step 5: Final Sanding
Wear your dust mask. Using 220-grit fine sandpaper, sand the repaired area with light, circular motions until the patch is completely flat and flush with the surrounding wall. Run your bare hand over the patch; if you feel a bump or recess, repeat Step 4.
Step 6: Prime and Paint
Drywall compound is highly porous and will absorb paint unevenly, leaving a dull spot. Apply a thin coat of interior wall primer over the patch. Once dry, roll or brush two coats of matching interior wall paint to match.
Common Mistakes and Troubleshooting
- Mistake 1: Applying Compound Too Thick: Heavy layers will sag, bubble, or crack during the drying process, requiring extensive sanding. Apply multiple thin coats rather than one thick layer.
- Mistake 2: Sanding Through the Mesh: If you sand too aggressively, you will expose the fiberglass mesh fibers. If this occurs, apply another thin skim coat of compound over the fibers and let it dry.
- Mistake 3: Skipping Primer: If you paint directly over bare spackle, the finish will appear flat and highlight the repair zone (known as “flashing”). Always prime first.
When to Call a Professional
While patching small holes is straightforward, contact a licensed professional or handyman if:
- The damage is near electrical outlets, light switches, or plumbing fixtures where active wiring or piping could be damaged. Never probe walls with nails or sharp tools near possible wiring or plumbing.
- The home was built before 1978, as disturbing the wall may release toxic lead paint dust, or before 1990, when drywall mud and joint compounds could contain asbestos.
- The drywall feels soft, damp, or shows signs of mold, indicating an active water leak.
- The hole is larger than 6 inches, or if structural wood studs are cracked, rotted, or cut.
- Note: Always follow the specific joint compound, patch, and paint manufacturer instructions for application temperature limits and curing times.
Cleanup
- Vacuum the floor using a shop vac equipped with a fine-dust drywall filter. Standard filters will clog instantly and blow dust back into the room.
- Clean putty knives immediately with warm water and soap. Dry them completely to prevent rust.
- Seal the joint compound tub tightly; lay a sheet of plastic wrap over the compound before closing the lid to prevent a crust from forming.
Sources & Citations
- United States Gypsum Company (USG): USG Sheetrock Brand Gypsum Panels Installation Guide (Accessed July 2026) - Specifications on curing times, joint compound application widths, and environment temperatures.
- Gypsum Association: GA-216-2021 Standard Specifications for the Application and Finishing of Gypsum Panel Products (Accessed July 2026) - National industry guidelines for finishing gypsum boards.
DwellNinja Editorial Team
Objective Homeowner Advice
The DwellNinja Editorial Team researches manufacturer documentation, product specifications, warranties, and professional guidance to produce practical homeowner guides.
Become a smarter homeowner
Get our twice-monthly homeowner guides and product insights sent directly to you.
Related Guides You Might Like
How to Install a Wall-Mounted Shelf Safely
Avoid sagging shelves and wall damage. Learn how to locate studs, choose the correct anchors, and mount heavy shelves securely.
How to Replace a Bathroom Faucet
Update your bathroom vanity. Learn the step-by-step process to shut off water, remove old fixtures, and install a new centerset faucet cleanly.